Juniper - OSPF Overview & Basic Configure
Open Shortest Path First Routing Protocol :)
흔히 OSPF로 불리우는 이 녀석은 Vendor 종속성이 없는 표준 Routing Protocol이다.
Network 를 하고 있다면 모를 수 없는 이녀석을 간단하게 훑어보고 간단한 설정을 해볼까 함.
심화버전 및 DeepDive는 이번 포스팅 다음에 살살 정리해볼까 하지만 이론적인 측면은
블로깅해도 읽는거보다는 스스로 공부하는게 좋다고 생각하기에 할지 안 할지는 미지 수 ㅎㅎ
아래 내용은 Juniper 홈페이지의 내용이다.
OSPF Overview
OSPF is an interior gateway protocol (IGP) that routes packets within a single autonomous system (AS). OSPF uses link-state information to make routing decisions, making route calculations using the shortest-path-first (SPF) algorithm (also referred to as the Dijkstra algorithm). Each router running OSPF floods link-state advertisements throughout the AS or area that contain information about that router’s attached interfaces and routing metrics. Each router uses the information in these link-state advertisements to calculate the least cost path to each network and create a routing table for the protocol.
Junos OS supports OSPF version 2 (OSPFv2) and OSPF version 3 (OSPFv3), including virtual links, stub areas, and for OSPFv2, authentication. Junos OS does not support type-of-service (ToS) routing.
OSPF was designed for the Transmission Control Protocol/Internet Protocol (TCP/IP) environment and as a result explicitly supports IP subnetting and the tagging of externally derived routing information. OSPF also provides for the authentication of routing updates.
OSPF routes IP packets based solely on the destination IP address contained in the IP packet header. OSPF quickly detects topological changes, such as when router interfaces become unavailable, and calculates new loop-free routes quickly and with a minimum of routing overhead traffic.
요약하면 OSPF는 IGP이고 링크 스테이트정보로 라우팅정보를 생성하면서~ AS기반 packet 전송을 하고 tcp/ip 환경에서
어쩌고 저쩌고 블라블라~ 라는데 일단 OSPF는 동적 라우팅 프로토콜 중 하나임 :)
This topic describes the following information:
OSPF Default Route Preference Values
OSPF Routing Algorithm
OSPF Three-Way Handshake
OSPF Version 3
Juniper 문서에서 위의 내용들을 짚고 넘어갔으니 한번 봅시다 :)
OSPF Default Route Preference Values
The Junos OS routing protocol process assigns a default preference value to each route that the routing table receives. The default value depends on the source of the route. The preference value is from 0 through 4,294,967,295 (232 – 1), with a lower value indicating a more preferred route. Table 1 lists the default preference values for OSPF.
Table 1: Default Route Preference Values for OSPF
How Route Is Learned
Default Preference
Statement to Modify Default Preference
OSPF internal route
10
OSPF preference
OSPF AS external routes
150
OSPF external-preference
Cisco 에서 AD로 알고 있던 값인듯하다.
이름이 조금 다르지만 Cisco의 AD, Juniper의 PV(Preference Value) 는 각 장비(OS)에서 우선순위를 정하는
일종의 비교 값이라고 이해하면 좋을 듯 싶다.
궁금해서 검색해보니 아래와 같은 정보를 Get~ㅋㅋ
Administrative Distance (AD) values in Cisco & Juniper
AD value is a reliability or trustworthiness of a protocol, for selecting routes to be placed in routing table.
If a router has routes to same destination from two different protocols it will prefer the protocol with lowest AD value, and its routes will be installed in the Routing / Forwarding table.
Cisco and Juniper use different values of AD for their selection criteria. Below is the comparison chart taken from their respective websites.
This table lists the administrative distance default values of the protocols that Cisco supports:

* If the administrative distance is 255, the router does not believe the source of that route and does not install the route in the routing table.
Default Route Preference Values
The JUNOS software routing protocol process assigns a default preference value to each route that the routing table receives. The default value depends on the source of the route. The preference is a value from 0 through 255, with a lower value indicating a more preferred route. Table 2 lists the default preference values.
Table 2: Default Route Preference Values
![clip_image002[4]](https://blogger.googleusercontent.com/img/b/R29vZ2xl/AVvXsEj8dJctIMv7zUY2zk31_Y5dH2y0BZ93IUW65XGbswwix-j0Ae5ifzLbvqpFZbg1oLhQCrjqLmF4JW5abA5b1graXOxxhs6ErNefdflBrAdpcnJqPUvQssVcXKDQEXCFfmNN3spUx8DpDds/?imgmax=800 "clip_image002[4]")
저 값들을 알고 있으면 도움이 되겠지만, 일단은 저런 게 있구나~하고 넘어가면 될듯하다 :)
OSPF Routing Algorithm
OSPF uses the shortest-path-first (SPF) algorithm, also referred to as the Dijkstra algorithm, to determine the route to each destination. All routing devices in an area run this algorithm in parallel, storing the results in their individual topological databases. Routing devices with interfaces to multiple areas run multiple copies of the algorithm. This section provides a brief summary of how the SPF algorithm works.
이하에 주구장창 긴 내용이 있지만, 이 정도만 알고 넘어가자 ㅎㅎ
SPF알고리즘을 쓰고 다익스트라 알고리즘과 유사하다
(대학교 때 이거 PT하다가 교수님한테 겁나 혼났던 기억이 나네 ㅋㅋㅋ)
OSPF Three-Way Handshake
이것 역시 많은 내용이 있지만 아래 그림만 알면 될듯하다 :)

OSPF 는 Hello packet을 통해 많은!! 정보를 주고받고 Neighbor를 맺는다 :)
OSPF Version 3는 생략 :)
출처: <http://www.juniper.net/documentation/en_US/junos12.2/topics/concept/ospf-routing-overview.html>
너무 서론이 길어졌다!!
이제 실습을 해봅시다!
![clip_image004[4]](https://blogger.googleusercontent.com/img/b/R29vZ2xl/AVvXsEjsZGhcnXvJn2iTy0uhZa9RxR8Cmy4IsvdKvqTmucT-RSm6bAeSZ416a8hI4d2KdgAf0767OsLuwORXOzp5rZ1BRF80ifkgMWk1LrnMb9djFOYUjXeb9WmBlRB2vetREo2wHJl7uuRvahQ/?imgmax=800 "clip_image004[4]")
기본적으로 지난 포스팅 환경에서 Static Routing대신 OSPF를 성정하도록 한다.
http://krdagbebe.wordpress.com/2014/12/15/juniper-configuring-static-routes/
깨알 기본 지식!
아직은 몰라서?? 그럴 수도 있는데 Juniper는 Config의 overwrite 가 안 된다;;
한 개의 Interface에 여러 개의 IP를 쓰는 Secondary IP 의 개념이 기본 탑재인 듯 한데...
이게 참 곤란하다 -_-;;
이게 무슨 소리냐 하면
set interface em0 unit 0 family inet address 1.1.12.1/30
set interface em0 unit 0 family inet address 1.1.13.1/30
하면 인터페이스에 IP가 1.1.12.1에서 1.1.13.1로 바뀌는게 아니라 두 개가 들어간다...
![clip_image005[4]](https://blogger.googleusercontent.com/img/b/R29vZ2xl/AVvXsEisY9-UGKiXZ2Bzgrky0dOyIMluRfkI8XqbpBfPJlePxxPVqeH-vk4Q2Jk_MCHw-NNhkQ6r8E1SLEnlRDz4S05rRiSBO_EPZmjyhf4DVuiDKltwDtTcA7U-sQ5Bk37ZraiwZiXq22-3cdo/?imgmax=800 "clip_image005[4]")
이런식... 해서 IP를 변경하려면 지우고 넣어줘야 하나보다....ㅠ_ㅠ 번거롭다..으어...
지우는 명령어는 delete address 1.1.13.1/30
일단 이제 본격 OSPF 설정하기!!
기존의 Static Routing 제거
delete routing-options static route 0.0.0.0/0
그리고 OSPF설정 :)
![clip_image006[4]](https://blogger.googleusercontent.com/img/b/R29vZ2xl/AVvXsEhltUYfGrEPHjAqVFMonNLGI651mz9JlItgJ6PZ-EdfqaDAGngDHn2sgnRQfFQqUzAPUoZDt76x0WzS8oTmytyrNmZfwN3iKczBCRMId6wadZAmRg2Ld-EfFCosb9skKfdqXHwSk5QvzIs/?imgmax=800 "clip_image006[4]")
아무래도 기본 설정이기 때문에 Area 0 (Backbone Area) 를 설정했다
눈치 빠르신 분은 아시겠지만 Interface 기반으로 설정을 하다보니
Cisco Passive Interface설정은 Default라고 봐야할 듯하다. 해당 문서는 찾을 생각도 없음 -_-;;
그러려니...하는게 정신건강에 좋다 ㅋㅋ
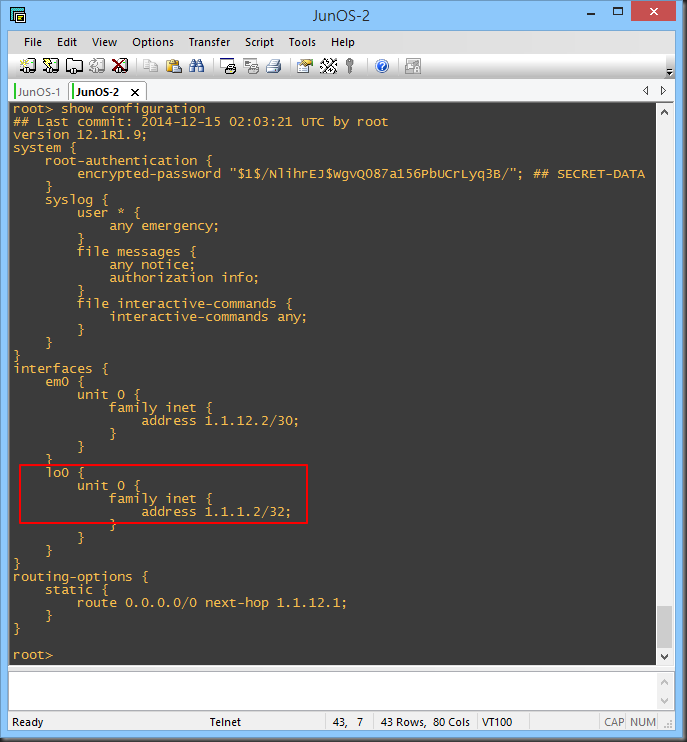
통신을 해야 하는 Loopback Interface를 추가 하고 확인 :)

저와 같은 초보를 위해 ..... 남겨두자면...
JunOS는 Commit을 해야 변경한 설정이 적용된다 -_-;;
관리자의 실수를 줄이기 위한 방법?으로 타 벤더들도 사용하지만 역시 Cisco로 네떡은 배운사람에게는
번거로울 수 있다 ㅎㅎㅎ
다시 확인 :)

Verify 하는 법은 별반 다를 게 없지만 'IP'가 없다!!
스샷에는 없지만 show ip os nei를 몇번을 친건지 ㅋㅋㅋ
그리고 Cisco에게 "do" 가 있다면 Juniper에는 "run"이 있다 :)
게다가 자동완성도 지원된다 ㅋㅋ(NX-OS도 되지만 IOS는 안되자나?!)
Config중 Edit mode에서 show 명령어를 치기 위해서는 run [명령어] 하면된다!
이제 다음에는 조금 심화 OSPF 학습을 해봅시다!!


Juniper - Ospf Overview And Basic Configure >>>>> Download Now
답글삭제>>>>> Download Full
Juniper - Ospf Overview And Basic Configure >>>>> Download LINK
>>>>> Download Now
Juniper - Ospf Overview And Basic Configure >>>>> Download Full
>>>>> Download LINK PZ